Showing posts with label art. Show all posts

Thursday, February 24, 2011

Teaching Kids the Magic of Color

The long cold days of winter are the perfect time to delve a little deeper into a few things I've been meaning to teach the girls. One such topic is color theory, and while the girls have known how to mix and make various colors since they were tiny, there's always room for practice. We also explored beyond primary and secondary colors, into tertiary colors and complimentary colors.


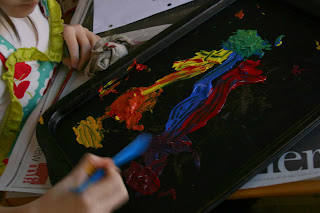
You want a big surface with enough space to mix lots of colors. I used baking sheets for this, and if you're using tempera or acrylic paints, it will wash right off with water. We started with only the three primary colors, along with one paintbrush and a palette knife. If you don't have a palette knife, you can substitute a butter knife or use clay tools, like we did.


Make a simple color wheel with blank spaces, and have the kids fill in the primary colors, and then have them mix the secondary colors. Encourage them to mix the colors thoroughly with the knife before painting.


From there move into tertiary colors, demonstrating how red mixed with orange makes red-orange, how blue mixed with green makes blue-green, etc...


After doing this exercise, my small girl exclaimed that there was no color she couldn't make. (I didn't have the heart to tell her about tone yet. YET.)


Next we talked about complementary colors, and how they relate to each other. We noted that they are opposite from each other on the color wheel, and that these colors tend to make the each other look brighter. Red and green, blue and orange, yellow and purple—all common color combinations that look good together


I encouraged them to mix the complimentary colors together, and the girls were surprised to see that they all made brown. We compared the difference between the rich browns we had just made and the brown straight out of the tube. It was clear to the girls the difference in richness of a color made "from scratch." We talked about how, really, we only needed the three primary colors, plus black and white in order to make any color they wanted.


In college, my professors were always telling us to make the color, not buy the color, and that a mixed color would have richness, depth, and interest that a factory color would be lacking.

Like a good recipe, it's the quality of each part that goes into the whole that's the difference between a ho-hum finished product, and an amazing one. Keep this in mind as you encourage your kids to make their own colors, using their knowledge of the color wheel as a guide. Their finished paintings will have a new level of interest to them, as well as an added level of involvement. And having kids push paint around with palette knives is a fine way to spend a long, cold day.

For more tips on teaching your kids to use color in their art, read my Beginner Drawing Lesson for Kids post on color.
Tuesday, November 9, 2010

Nana's Portfolio

The special piece I mentioned in my previous post about handmade books is a portfolio of my grandmother's artwork. When she passed away, we cleaned out her apartment and found her portfolio stashed away in the back of a closet. It was full of pieces she had completed when she studied fashion in art school in the early 1930s.


I was smitten, and touched, and amazed by every one of them. Each piece had visible brush strokes and pencil marks made by the hand of my grandmother. Her name was carefully lettered at the top of each page, and some even had grades scribbled on the bottom—A+, of course. Go Nana! 


These papers were big. They measured 14"x20" so, though I marveled at them for a while, they eventually ended up stashed in a closet once again . Last year I decided these pieces of family history needed to be liberated, and I had the idea to make mini portfolios. I scanned the art (and tiled and scanned some more), and shrunk the images to fit in small books. I made three of them and gave one each to my father, my aunt, and my sister.


I'm kicking myself for not making one for my own family at the time but I will make one someday, so that my girls can flip through and see their great-grandmother's art whenever they please.


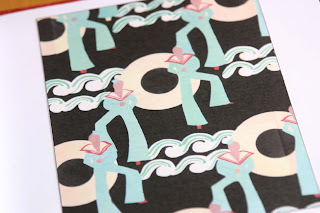
Her pictures are glamorous and sleek, with a graphic quality that is so very reflective of that time.


I have always been curious to know what, exactly, the assignments were. Check out this sailor pattern. Looks like a textile pattern to me, and I am tempted to put an order in with Spoonflower. Imagine custom fabric arriving at my doorstep, designed by my very own Nana, some 70 years ago? 
Oh, the possibilities...

Monday, August 16, 2010

Beginner Drawing Lessons, Part II

Welcome to the second lesson of this three-part series: Value

In art, value refers to the darkness and lightness of color or tone. The variations in light and dark within a drawing are what will make it come to life. Have you ever noticed how an unexpected highlight on an object makes it really pop? Or have you felt the depths of a darkly-rendered shadow? Yep, it's all about value. From the highest value—white, to the lowest value—black, and everything in between—this is what creates volume and sense of space and depth.

In our still life of the group of tomatoes, we first took note of where the different light sources were coming from. Then we noticed where the brightest and darkest parts of our scene were. After those easier to identify values were determined, we discussed the more subtle shades, looking at how the lighter parts of the tomatoes fade gradually into different shades of darkness. This lesson is meant to be practiced in black and white, using pencil/charcoal on paper, so kids won't confuse light and dark color with light and dark value.

There are different ways to render value. Some artists use cross hatching, others use sketchy lines or scribbles, others blend their pencil/charcoal to create gradual changes.

A good way to practice different values of light is to make a value chart. Simply draw a rectangle about 6" long and, starting with white, gradually sketch darker and darker values across until you have the darkest possible color your pencil can make. Show them how they can create darker colors by bearing down harder on the paper, as well as by using more lines closer together.

Value Exercise:
  • Start by having your kids make a value chart. This will help them recognize the subtleties in all the shades between white and black.
  • Have them try a few different ways of shading, and let them chose the method they prefer.
  • Using a simple still life like the one in the previous lesson, ask your kids to tell you where the light is coming from how it is shining on the objects. It may help to set up the still life next to a window or a lamp, so that there are strong lights and darks for them to identify. You could even rig up a flashlight to make extreme shadows.
  • Next, ask them to point to the brightest and darkest parts of the objects. Once those are established, have them take note of all the different shades in between.
  • When they begin to draw, encourage them to use their value chart as a reference. Suggest that they use the white of the paper as the brightest spot, and fill in the lower values from there.
  • If the kids are into it, ask them to try drawing one without using any lines at all. See if they can render objects just by creating various values.
Have fun! See you back here soon with the last lesson: color.

Sunday, August 8, 2010

Beginner Drawing Lessons, a Three-Part Series: Part I

NOTE: My apologies to those who subscribe in a reader. I accidentally hit "publish" in the middle of my first draft of this post. I deleted it immediately , but I think some of you still got the wonky post. Oops!

Welcome to my Beginner Drawing Lessons, written with kids in mind, but perfect for adults, too. This series is the result of many sketching sessions with my girls, during which I realized there are a few recurring concepts that I am always reminding them of. For these lessons, I have reduced lots of information into three basic ideas that can be utilized when drawing:
  • Line
  • Value
  • Color
There are the shapes and how they relate to each other (line), there is light and shadow (value), and there is color, with its many variations.
Those three things are basic concepts that, once understood, will help you or your child have a better grasp of your subject matter. This information can also be applied to painting, sculpting, digital art, and so much more. Each of the three lessons include an exercise at the end of it, so you can practice your new skill. I would recommend this series for children 6 and up.

The first lesson of this three-part series is Line.

Line is the shape of objects, the actual outline, and how shapes relate to each other. For example, in our still life of a group of tomatoes, we noticed how each tomato looks different—some had more lumps, some were more round, some oval in shape. Then we looked at how the tomatoes were arranged. We saw how some were in front of others, and that some were partially hidden. Look at where these objects overlap, as well as the negative space. Sometimes, when an object proves tricky to draw, observing the shape of the space between the objects can be helpful.
Encourage the kids to look at the true shape of things, meaning not what their brain says they should see but, rather, what they are actually seeing. Our minds register "tomato" as bulbous and round in shape, but their shapes can be quite varied. Point out irregularities in objects, and encourage your kids to include those. We (and especially kids) tend to want to draw the "idea" of a certain object, rather than what we are really seeing. A college art teacher of mine used to always say, "draw with your eyes, not with your brain."

Line exercise: Set up a still life made with a few simple shapes. Fruit, balls, bowls, and vases (skip the flowers this time) are good choices for this first exercise. Avoid objects that have a lot of detail on them, as the kids will be tempted to render all that detail first thing.
  • See if you can get your kids to just observe the still life for a few minutes before starting
  • Talk about the outlines, the shape of the negative space, the places where objects overlap each other, and how that effects their shapes
  • Ask them to point out irregularities in the shapes
  • have them trace the objects with their finger
  • When they begin to draw, remind them to draw what they see, not what their brain tells them a shape should look like
Have fun! See you back here soon with the next lesson: value.

Monday, July 5, 2010

Bringing the Oustide In

Come out for a tour of the girls' bedroom,

where butterflies alight,

and doves fly.

A place where roses unfurl no matter the season,

daffodils bloom all year,

and the sun shines every day.

It's a dreamy place to sleep and play

Friday, June 25, 2010

What To Do

We're only a few days into summer vacation, and I have found myself scouring my favorite blogs and sites, looking for crafts to do with my girls a few times already. Turns out, there is a ridiculous amount of brilliant ideas and resources out there—tutorials, recipes, suggestions, and even more lists of things to do. Jackpot!

I've compiled a list of my favorites for you and me :

Paint a fresco (FuoriBorgo)

Make your own bug catcher (Shivaya Naturals)

Craft up some clay suns (Twig and Toadstool)

Make some Custom Drawn kid stationary (Just Something I Made)

Have your kids make their own ink Blob t-shirts (Vintage Chica)

Make mobiles from found drift wood and beads (Wise Craft)

Try some corn syrup painting (The Crafty Crow)

Make a moss terrarium (Poppytalk)

Learn block printing: tutorials Part I & Part II ( from me!)

fold up some Origami paper wallets (Future Craft Collective)

Squeeze some fresh orange juice and make sun eggs (GardenMama)

And more lists to pour over!

The Long Thread's round up of 50 Summer Crafts for Kids (check out the Stone Dolls from MayaMade)

list of great games to play with kids over at Mommy Coddle

List of outdoor summer activities at 5 Orange potatoes

list of Artful Books for Children from Quince and Quire

and this list of resources for nature-based summer learning, from The Snail's Trail

Thursday, May 20, 2010

Paintings From (not so) Long Ago

It's nice to go back to art I made long ago, when my perspective was so different, yet still much the same.

With each piece I revisit, I am transported to that time—where I sat, what I was listening to, how I was feeling, even the weather that day. Such strong associations with each work of art must mean that the process for each of them was significant to me, in some way.

These laundry pictures were painted when we lived in San Diego, I was unemployed, and pondering an attempt at making a living through painting. A few weeks after these were completed, I was pregnant, employed, and feeling vulnerable from the September 11th attacks.

I wonder if, in 9 years, I will look back at my works in metal, and remember my world as it is today, in May of 2010?(A mother of 2 girls, trying to make a living as a metalsmith, and hopeful for the future of my family.)

Sunday, April 25, 2010

Learning

There's been lots of learning going on around here. From raw food to instrument maintenance, our recent explorations have run the gamut.

"A," an avid jazz pianist, is learning to tune pianos. This is not the beautiful music we are used to hearing on a daily basis. This is a lot of bent notes and piercing, almost screeching sounds, played over and over until the notes are brought back to their soothing songs. And once the entire piano is properly tuned, he takes it back out of tune, and starts all over. Practice makes perfect, right? I'll keep telling myself that.

The girls have been learning to draw with charcoal. The smudging, blending, and erasing has opened up lots of new creative exploration in their art.

We're participating the the Green Smoothie Challenge, experimenting with different combinations of kale, apples, mangoes, chard, and bananas, so far. Surprisingly yummy, though not all of them have been a success. On to spinach!

This year, I'm learning to start my seedlings under lights. The south-facing windows have left much to be desired from my seedlings in previous springs. Hopefully, the heat and constant light will yield beefier plants—if I don't fry them first with the scorching fake sunlight, like last year.

I'd love to hear what new things you've been learning and experimenting with. Let me know!

Sunday, March 14, 2010

Linky Love, the First of 2010

Want to know what has inspired me lately? There are far too many different people, projects, articles, and art to mention, but here's a (small) sampling of my recent favorites:

First, Kate of Marmalade Moon has reviewed books on creativity AND she's giving away one of my sterling silver bookmarks! Head on over to her blog, read her book reviews, and leave a comment to enter to win.

I am participating in String-a-Long 2010, hosted by Mousey Brown's House and Rattling On... Here's one I have already completed. These string bags work up super fast and easy, so I am making a whole bunch.

Mandy's illustration, Yellow Iron with Steam, is winning me over (even though I don't iron)

I am loving anything and everything Made by Joel

We are planning to craft a large flock of these Spring Birds

I'm brimming with ideas from the e-book 52 Weeks of Blogging Your Passion

Happy to have found 3 great ways to spend MORE money

Drooling over this recipe, from Staten Eats

The graphic artist in me has a crush on these Daily Drop Caps. I might just have to decide on a fav to use on my blog.

I'm excited to suggest Green Fundraising with Let's Go Green at the next school parents' meeting.

Jane's family (of Jane Was Here) has received roughly 720 cards, and counting. AMAZING!

...aaaaand last but not least, I had fun making a few of these Swat Team Kitties for my nephew Nicholas and another little friend, Elizabeth (happy birthday to you both!) . I hadn't knit or crocheted any new friends since the holiday projects and birthday gift. It was a much-needed break but it's good to be back at it. The girls have noticed a lack of new stuffed cuties, too, and they're putting the pressure on now. Stay tuned for more...

There's so much out there to be found on the web. I wonder what I'll stumble upon next? What will prompt me to start along a new creative path, try a new ingredient, or rethink how something is done? I promise I won't hoard all the good ideas.

Monday, March 8, 2010

Design in the Drink

This weekend we found design in some unlikely places—our drinks:

Just-juiced fruits and veggies merged, then separated into a rainbow of layers.

Before it was stirred, the chocolate syrup lay in heavy swirls on the bottom of a glass of milk.


Where have you been finding design?

Saturday, February 27, 2010

A Month of Love and Luck

February turned out to be quite the month. While the grays and browns all around attempted to steal our inspiration, the blogging world pull through, as usual. Giveaways, swaps, tutorials, guides, and links rescued me from going seriously house crazy. I even had a little luck this month, too.

Until now, my only brush with luck was winning a raffle at my university's health fair. The prize? A first-aid kit. I remember being a little disappointed that I had used up all my luck on a couple of gauze pads and an ace bandage. (It's worth mentioning that I put that first-aid kit to good use a year later in South Africa. Guess I won that for a reason, in hind sight.)

Flash forward to a few weeks ago when I won this brooch in a giveaway from Emily at Mousey Brown's House. Emily custom designed this pin, taking in to account my favorite colors and thoughtfully including a metal-rimmed button, as a nod to my works in metal. She rocks.

Then, I won this luxurious yarn last week from a Soulemama giveaway. This 100% Merino Wool from The Spun Monkey is so much softer and more beautiful than it looks in this photo. The colorway (Cloud Bunny) would be so perfect for a baby gift that's on my to do list, but I am not so sure now. That yarn may just have to stay in my household.

Luck aside, there was also lots of love going around in February, of course, and this year much of it landed in my mailbox. Gardenmama organized a valentine swap, so I jumped on the chance to participate in it (and then wondered why I would add something else to the above mentioned to do list). Truth is, I signed up because it was another excuse to create something that wasn't filling an order or slated to be sold. A chance to make something I would be exchanging with a group of women who inspire me endlessly.

Little did I know what a treat I was in for. Each valentine that arrived was original, creative, and thoughtful. So much more than I ever expected—they are all so very generous and genuine. I was running to the mailbox everyday, hoping another little masterpiece had arrived. Let me introduce you to these artists, mothers, crafters, photographers, writers and all-around creative and inspirational gals. Meet Kerry, Lisa, Stephanie, Pennie, Tonya, Stacey, Kristin, Nicole, Nicola, and Amy. Thanks ladies!

Tuesday, February 2, 2010

block printing for all

Whenever "A" makes a piece of furniture, he marks it with an original carving—usually hidden (like on this table), always incredible. Recently, he decided he wanted to explore wood carving a little further, and try his hand a woodblock printing. With this, my mind started zooming. I wanted a piece of this action, and I wanted to introduce the girls to some block printing, too. Since wood carving requires very sharp tools, the girls and I opted for linocut. (...and then I remembered Maya's beautiful cardinal. Oh, the possibilities!)

I recalled the techniques that had gotten dusty in my head (too many years since the days of art school). After we fooled around with the tool and the different tips for a while, we all started to work the kinks out. Still struggling with controlling the lines, the girls decided they would create images that were mostly black (good call). Here's what we ended up with:

a second grader's solar system

a kindergartner's rose


a woodworker's tree scene

...and a metalsmith's hen (this is "Rocky", the beast who continues to eat her own eggs)

We have plans now, many plans—starting with more practice. Custom stamps for friends, prints on cards, teeny little icons to carve, as well as bigger woodcuts. Working in new mediums has a way of stirring up the creative juices that the daily work (in metal, for me) sometimes lets settle.

Monday, January 11, 2010

Henna Art

Santa brought the girls henna this year, and school vacation gave us lots of time to learn about the ancient art form and have fun with it. We started by researching online and found so many inspiring images, like this amazing work of art.

The elaborate designs were striking and the detail is insane. We practiced drawing flowy lines and filled organic shapes with traditional intricacies. The girls sketched their ideas, choosing elements from different references, and came up with original designs.

Practicing the art form on paper was the highlight for the girls, and they filled many pages in their sketch books with mehndi designs.

They each chose their favorite from their own inventive sketches, and I applied the henna. I tried oh so hard to keep pieces true to the original designs, but don't think I did the six-and-seven-year-olds' fine work justice. Seems this mama isn't quite capable of matching the impulsivity and freedom of her kid's art. (I'm workin' on that, though)

After working with the henna on these illustrations, I have the utmost respect for artist who can render that liquid into sprawling designs made of intricate details.

The girls had fun showing everybody their new body art, explaining what they used, and how it was done. I even witnessed my one of them reassuring her grandmother that the henna will wash off in about a week. Not to worry—no real tattoos, like Mama and Daddy. Yet.

Tuesday, November 24, 2009

Book Art

The girls have a new tradition when we visit my parents. My mom takes them to the basement and they go "shopping". To them, it's like going on a treasure hunt. They come back upstairs with bags full of old Christmas decorations, various plastic serving dishes, and out-dated costume jewelry. I brace myself to see what they found and, ultimately, want to take home (so much for trying to get rid of the clutter).

But the one thing they always come up with are books. Hardcover books that they have been granted permission to do whatever they please with. This is an absolute thrill to them, and I can see why. It's the joy of being given carte blanche to something that is usually to be treated with care and respect (careful, that's a library book!). And what they come up with is great...

Sometimes they write complete stories.

(some of them are suspense thrillers)

Sometimes they use the books like you would use a sketchbook, and doodle on each page.

The girls will sit for long periods of time with these books and write, draw and scribble in them just because they can. I save all of them, and the great thing is that all this work is bound neatly together already—no loose papers to gather up and go through.

Buying hardcover books would be a good purchase for the kids at a yard sale (instead of that skanky Snoopy stuffed animal they inevitably want). Tell them it's theirs to do whatever they please with, take it home, and watch their newly-granted licence inspire them.